Wednesday, March 21, 2012

Early Spring

You already know it and you’ve heard it a dozen times by now, but this weather is insane. The extended stretch of unseasonably warm weather is wreaking havoc with all manner of botanical timetables. Case in point: our Sargent cherry (Prunus sargentii) that we enjoy so much every year is blooming a full month ahead of schedule. Whatever “schedule” means anymore.  Still, it’s welcome beauty.


Cherry 2012

Sunday, March 11, 2012

Meet Tommy

I’d characterize March as the month that has the hardest time making up its mind. The weather changes quickly and even though it looked like this out the back door only a week and a half ago--

--today the temperature was in the lower sixties and crocuses and the early hellebores are blooming.  Curious as to how the vegetable garden was faring I took a walk and found some green poking up through the leaf mulch.


Spinach that survived all winter and is now sending out new growth


The French sorrel is unfurling red-tinged leaves.

The patch of alpine strawberries seems to have made it as well. I’ll need to divide and separate these early this season since I essentially unpotted the seedlings and stuck them in the ground as a clump last fall.


Only a few of the garlic plants have emerged so far. This one is ‘Music.’


The biggest surprise survivor is this battered Green Oakleaf lettuce.


Indoors the garden is off to a good start, too. I’ve been sowing seeds in the basement and the first batch is starting to germinate. Which brings me to Tommy.


At the Co-Conspirator’s suggestion we’ve christened this particular San Marzano tomato seedling Tommy. We’ll be following his progress through the season from the seed starting rack hopefully right to the table. Along the way we’ll share some interesting tidbits about gardening, canning, pickling and cooking. Tommy’s just a little sprout right now, but he’ll be all grown up almost before we notice.

Wednesday, February 22, 2012

Freezing Garlic

I’ve been having some anxiety lately surrounding garlic. More specifically, I’ve started to worry that all the garlic we grew and stored last summer wouldn’t last until we’d used it.

Garlic is a great vegetable. So many of my favorite dishes include it and it stores so easily that it seemed logical that we should grow a substantial quantity of those funky, fragrant bulbs. In the past, we’ve purchased winter farmers’ market garlic that was dry, dusty and frankly moldy so I wasn’t overly optimistic about keeping garlic in Wisconsin through the winter. When I harvested our crop last summer I hung it in baskets in the basement to cure a while before tying it in garlands to hang in the fruit room/root cellar/server closet—it is the Twenty-First Century after all!
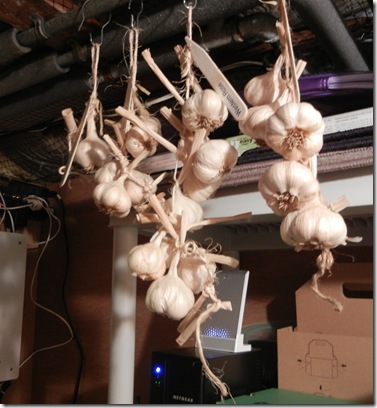
Since that room is visited frequently, I was keeping an eye on the state of the bulbs and have been happy with how they’ve been keeping. Lately, however, I’ve noticed the outer skins on some of the bulbs I’ve brought up to cook with have been more dry and looser. Also, some bulbs are showing sprouting cloves. They’ve got nowhere to grow at this point and are still safe to cook, but I decided that just in case I’d process and freeze some of them. I selected the remaining five bulbs of ‘Tai Lang’ for this project. Incidentally, I’ve found nothing about this cultivar online; Googling it just brings up my own references to growing it. All I know is I bought it at the Westside Community Market and the seller said it was hot.

The first step in processing garlic for freezing is to peel each individual clove. When I’m doing one or two or five for a recipe I just cut off the root end, halve it lengthwise and then flake away the skin with a knife. To peel quantities of garlic I use a faster method. First, separate all the cloves in the bulb and cut off  the root end. Then, lightly crush them with the flat of your knife. Be careful. You’ll end up with a chaotic pile of garlic cloves and papery skins.

Next, get a couple of bowls, preferably stainless steel, that are close to the same size. In a pinch, you can just use a bowl and a plate.  Put your distressed garlic cloves in the bowls and get ready to rumble!

Cover one bowl with the other and sha-a-a-ake vigorously. Listen to the tone and you can actually hear when the cloves have been removed from the skins. It’s pretty cool and I’m sure there’s some big-ass industrial machine out there that uses the same principle to do the same thing. Now you just pick the oh-so-tasty garlic cloves out of the skins and set them aside.

Next, chop the garlic to make it easier to dispense and use. Either coarsely chop it by hand if you have the time and patience. I didn’t so I used a mini food processor. Don’t overdo it. If you want a finer chop later you can always do it then.

The final step is to get some protection on those chopped cloves. Drizzle in a little olive oil and stir it into the chopped garlic. A little goes a long way! The key is to coat the cloves without having them swimming in it. Stir thoroughly so that they’re completely coated. The oil will keep the garlic from turning ugly colors and also make it easier to spoon out the quantity you need when cookin’ time comes around.

Finally, put the oiled garlic in a jar and screw that lid on tightly. Keep it in the freezer and just scoop out however much you need in your future cooking. You’ll thank yourself for putting in the effort now not only for saving yourself the chopping later, but for also saving some produce that may not have lasted until the next crop comes ready.How do you keep your garlic? I’d be interested in hearing new ideas on growing and storing one of my favorite crops. Comment or email to share your ideas.

This riveting, stem-grinding offering is part of Post Produce, hosted by Daniel Gasteiger over at Your Small Kitchen Garden. Check it out!

Thursday, February 16, 2012

El Día de San Valentín

On Monday we returned to cold, white Wisconsin from some time in hot, colorful Costa Rica. What a letdown. Fortunately Tuesday was a holiday, I’m still layed off this week, and one of the mementos we brought back from Puerto Jiménez was a cookbook. All the means to compensate for having to come home were in place. The book is “Gallito Pinto: Traditional Recipes from Costa Rica.” I consulted it to devise a menu and went grocery shopping.


The first course was a cocktail I concocted with carambola, also known as starfruit. It’s got sort of a weak flavor but some calvados and lime juice rounded it out and the garnish couldn’t have been more obvious.


For  munching along with the cocktails I whipped up a batch of striped seabass ceviche. We’ve been talking about making ceviche for three years since we had it so often in Ecuador but this is the first time we’ve followed through. It’s so simple there’s really no excuse.


For the salad I took the easy route and did a pseudo-Caesar but with fancy-schmancy heart-shaped eggs. I briefly entertained the possibility of coloring them pink. Maybe next time.


The main course was Bistec Encebollado, better known as steak and onions with Chacletas de Chayote—mashed chayote and cheese stuffed in the exotic fruit’s skin. It was unusual but good. Cheese can make anything good, though. I’d make it again.


For dessert I whipped up a couple of simple mini flans. They weren’t much to look at but tasted delicious. I only wish I had remembered to put some coconut in them. As it was, they were so good I dug in before I remembered to take a picture.


DSCN1818


One traditional dish we did not have but saw a lot of in Costa Rica was the black bean and rice dish called Gallo Pinto. It was served at any or all of the three meals of the day and with all the hiking we were doing was a welcome, high energy dish. I’ve definitely found a use for some of the black beans I grow every year.


Check back to see the wild side of Costa Rica coming soon!

Saturday, January 14, 2012

Garden Planning

I suppose it’s time I got thinking about what to grow in the garden this year. It may only be the middle of January but with the way time flies when I’m having fun seed starting time will be here before I know it.


Last month I did an inventory of the seeds I have on hand with notes on quantity and age. Armed with a list of crops I’ve run out of and want to grow again as well as a wish list of new things I’d like to try I’ve been perusing the pile of seed catalogs. Some varieties are common to several sources and some are available at only one place. Clearly I’ll have to place more than one order, but I’ll check the local garden centers first, of course. I’m also anxiously anticipating the arrival of the Seed Savers Exchange Yearbook that should be mailed toward the end of this month. I joined SSE last year for several reasons including access to that catalog of nearly fourteen thousand varieties. My hope is that some of the more unusual vegetables I’ve been reading about in nineteenth century garden books might be available there. And in addition to those sources, my seed guru will be offering up some goodies.


The part of the planning I don’t relish is trying to figure out how to rotate crops. In order to avoid depleting specific soil nutrients and to confuse overwintering pests one should avoid planting things from the same family in the same spot for several years. I like to think of myself as organized but when I look around online and in books at the way some people garden I wonder if they’re putting me on. I see a lot of plans where each bed has been assigned a neat succession of plantings to take it through the season. There’s even a nifty program that will help you in planning rotations. I couldn’t use it because I just don’t garden that way. 


To the extent that I do plan, I try to avoid egregious mistakes like planting all the tomatoes in the same place two years in a row. This year, for example, in the half of the garden we’d newly acquired I planted the tomatoes where I was fairly sure the previous gardener didn’t plant hers. Good so far. But I had too  many plants for that area so three additional plants found homes in three different rows of beans. I managed to get my Brassicas in a bed that had been mostly Brassica-free in 2010, but when some plants croaked early on I decided to fill that spot with another pepper. See the picture? Instead of neatly grouping plants like in the idealized plans, I’ve got random, single plants tucked in here and there wherever the opportunity arises. I can look back on previous years’ plans—which are actually records of what went on, not what was anticipated—and try to place things in the best spots. But it becomes something of a puzzle.


Maybe I just won’t worry about it too much. I’ll use my records to keep from putting entire blocks of plants where their relatives have grown for at least a couple years. But there’s inevitably going to be some overlap. If nothing else, I can use that as an excuse if something doesn’t grow as well as it should.

Saturday, January 7, 2012

Beekeeping Planning

The preparation for starting our beehives is proceeding with what feels like increasing speed. When we first decided to undertake the pastime I had already been doing some reading, watching videos and listening to podcasts. At first I was all “this isn’t so complicated once you understand bee biology.” Since the three of us all have backgrounds in science I figured we could understand enough to get started and then learn from our inevitable mistakes.


Then I ramped up my reading, consulted more sources of information online and looked into some of the seemingly endless variations in hive construction and management. Information overload set in with a side order of analysis paralysis. I became overly concerned with doing everything the right way from the start. The problem, however, appears to be that there isn’t one right way, but probably many.


Bees on CloverA little peace of mind came from the local beekeeping association. At the last monthly meeting we finally had a chance to chat with several members who were more than happy to inspect the trial hive body the other Mark had made and talk with us about the ins and outs of getting started. We also visited the home of one of the members where she enthusiastically showed us how she builds her equipment and tends her hives. By the time we left we were charged up and ready to settle on the equipment configuration we will start with.

  • All medium depth, home-made, 10-Frame Langstroth hive bodies. My thinking is that most of the people we’re going to be learning from at this point in our beekeeping careers are using Langstroths and so will be most knowledgeable about them. I do reserve the right to try out some of the other styles once we get the basics down.
  • A mix of home-made and purchased foundationless frames. We’re hoping small, natural, bee-sized cells will help hold the Varroa mites back a bit as has been reported.
  • A screen bottom board. Again, Varroa defense allowing the little buggers to drop to their deaths. An insertable white board will allow us to do mite counts when we want to. The screen will provided more ventilation, too.
  • Buying package bees, most likely three pounds per hive. We’re having a bit of sticker shock now that we’re shopping for these. I don’t know where I first read prices way last summer, but what we’re seeing quoted now is more than twice what I had been expecting. Consequently, we’re most likely starting with two hives rather than the five “someone” was hoping for. Nucs are way out of our range at this time.

As for plans/hopes for the probably more distant future we’d like to try our hand at queen rearing if we wind up having some good survivors. The thrill of the swarm capture is also appealing. And, as I mentioned before, we’re interested in building some other hive designs. Now the more I learn about beekeeping the more I see it as having potential for lifelong learning and experimentation rather than being completely unapproachable.


[For the record, I believe the pictured bees are wild native bees, not honeybees]

Thursday, December 22, 2011

December Post Produce: Sautéed Brussels Sprouts!!!

Winter may actually be here now that we've had a couple of snowfalls. Now is when the staying power and storage characteristics that have made some crops popular is evident. When I visited the garden recently to harvest the last parsnips I also checked on the abandoned Brussels sprouts. Temperatures had been below freezing more than once so I wasn't really expecting them to be usable anymore. Mostly I wanted to get them pulled out and composted to keep the garden as tidy looking as I could, a hang-up I may work on overcoming in 2012. There were still at least a pound of tight little sprouts on the stalks just the right size for eating. I stripped them all off knocking ice pieces from inside the outer leaves as I went. A few days later we were doing a typical "what should we have for dinner?" and pulled the bag of sprouts out of the refrigerator. I was pleased to find that they weren’t mushy and watery like other vegetables that have been through freezing temperatures.

A quick sauté of lamb gyro sausage we had laying around with onions, red chili flakes and cherry tomatoes made a delicious and colorful dinner. There are still some sprouts in the fridge waiting for the next meal. I’m thinking they’ll probably accompany one of the local, free-range chickens we’ve got stashed in the freezer along with the last of the turnips.

This fascinating dish was brought to you for Post Produce for Daniel’s Your Small Kitchen Garden. Check it out for more gardening, cooking and preserving inspiration.