Yesterday morning The Other Mark and I got together at the apiary and did splits. We had been discussing for a while whether we could or if we should even try. With the input of more experienced beekeepers we decided to go ahead and give it a try. What? You knew I was talking about beekeeping, didn’t you?
The Dane County Beekeeping Association received a grant to obtain and propagate Varroa Sensitive Hygiene Queens. In brief, these queens have been selectively bred for behavior that protects their hives from a plethora of pests and diseases greatly reducing the need for nasty chemical interventions. And they’re expensive. The grant and generous work of one of our members allowed others in the association to purchase them for much, much less so I ordered two intending to use them to requeen the two package hives we got back in May. Then, we learned at the last meeting that we could use these queens to make new hives by splitting our existing ones
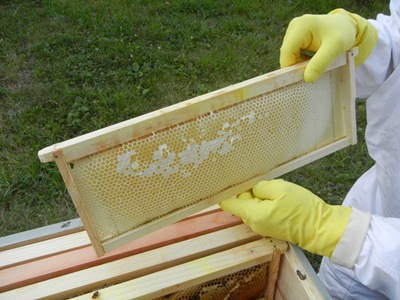
Splitting a hive involves removing frames of brood, pollen and honey along with any bees on them from an existing hive and putting it into an empty hive to start a new colony. This is one of the honey frames we took from Mary, the hive we rescued from a wall. We also took a couple of frames with brood in various stages including capped, and another frame of honey and pollen.
The queen cells were brought home in a wooden block that had holes drilled to accommodate them. The queen cell hangs down from a little plastic cup. How it’s constructed I don’t know but I should read up on that. It’s doubtless an interesting process. We selected a frame that had a nice patch of brood in various stages of development…
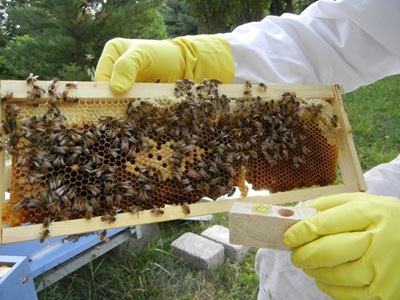
…and just jammed the cell into the middle of it maintaining the vertical orientation.

Then, we placed the frames in their boxes and, in the case of the split we took from Margaret, positioned the hive on the last vacant stand in the apiary. The one from Mary—and this is the exciting part!—I loaded into my car and brought home to a spot I’d prepared in the back yard. Meet Ruby.
 We did the splits early in the morning before the foragers had started flying for the day. When I got home and removed the screens we’d stuck on for transport they slowly, placidly began coming out to explore their new home. By mid-morning there were a good number of gentle, relaxed bees flying around the hive. I spent a good part of the day just watching them.
This is the time of year to be getting a beehive ready for winter, believe it or not, and that’s done by making sure you have a young, laying queen in residence. These queens should emerge in a few days, spend about another week maturing and then yet another week or so after that making mating flights. After that, we should start seeing eggs in the new hives. Our fallback plan, should the new and/or existing hives not be strong toward the end of summer, is to remove the old queens and combine each new hive with an old one. I’m really hoping it doesn’t come to that.


