I’ve been having some anxiety lately surrounding garlic. More specifically, I’ve started to worry that all the garlic we grew and stored last summer wouldn’t last until we’d used it.
Garlic is a great vegetable. So many of my favorite dishes include it and it stores so easily that it seemed logical that we should grow a substantial quantity of those funky, fragrant bulbs. In the past, we’ve purchased winter farmers’ market garlic that was dry, dusty and frankly moldy so I wasn’t overly optimistic about keeping garlic in Wisconsin through the winter. When I harvested our crop last summer I hung it in baskets in the basement to cure a while before tying it in garlands to hang in the fruit room/root cellar/server closet—it is the Twenty-First Century after all!
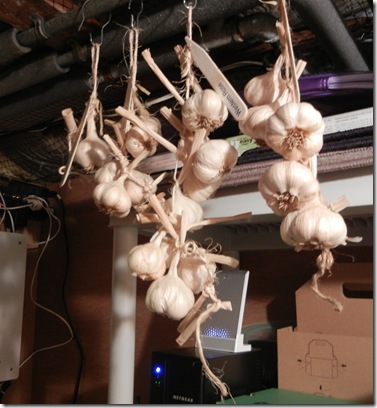 Since that room is visited frequently, I was keeping an eye on the state of the bulbs and have been happy with how they’ve been keeping. Lately, however, I’ve noticed the outer skins on some of the bulbs I’ve brought up to cook with have been more dry and looser. Also, some bulbs are showing sprouting cloves. They’ve got nowhere to grow at this point and are still safe to cook, but I decided that just in case I’d process and freeze some of them. I selected the remaining five bulbs of ‘Tai Lang’ for this project. Incidentally, I’ve found nothing about this cultivar online; Googling it just brings up my own references to growing it. All I know is I bought it at the Westside Community Market and the seller said it was hot.
 The first step in processing garlic for freezing is to peel each individual clove. When I’m doing one or two or five for a recipe I just cut off the root end, halve it lengthwise and then flake away the skin with a knife. To peel quantities of garlic I use a faster method. First, separate all the cloves in the bulb and cut off the root end. Then, lightly crush them with the flat of your knife. Be careful. You’ll end up with a chaotic pile of garlic cloves and papery skins.
 Next, get a couple of bowls, preferably stainless steel, that are close to the same size. In a pinch, you can just use a bowl and a plate. Put your distressed garlic cloves in the bowls and get ready to rumble!

Cover one bowl with the other and sha-a-a-ake vigorously. Listen to the tone and you can actually hear when the cloves have been removed from the skins. It’s pretty cool and I’m sure there’s some big-ass industrial machine out there that uses the same principle to do the same thing. Now you just pick the oh-so-tasty garlic cloves out of the skins and set them aside.
Next, chop the garlic to make it easier to dispense and use. Either coarsely chop it by hand if you have the time and patience. I didn’t so I used a mini food processor. Don’t overdo it. If you want a finer chop later you can always do it then.
 The final step is to get some protection on those chopped cloves. Drizzle in a little olive oil and stir it into the chopped garlic. A little goes a long way! The key is to coat the cloves without having them swimming in it. Stir thoroughly so that they’re completely coated. The oil will keep the garlic from turning ugly colors and also make it easier to spoon out the quantity you need when cookin’ time comes around.
 Finally, put the oiled garlic in a jar and screw that lid on tightly. Keep it in the freezer and just scoop out however much you need in your future cooking. You’ll thank yourself for putting in the effort now not only for saving yourself the chopping later, but for also saving some produce that may not have lasted until the next crop comes ready.
 How do you keep your garlic? I’d be interested in hearing new ideas on growing and storing one of my favorite crops. Comment or email to share your ideas.
This riveting, stem-grinding offering is part of Post Produce, hosted by Daniel Gasteiger over at Your Small Kitchen Garden. Check it out!


